Search my Blog-site

Sunday 28 April 2013

Urban Decay Naked Basics Palette (review, swatches and pictures)

So as you might have seen in my previous haul post, I have jumped right onto the Naked Basics palette wagon and like many others, I love it. It's so versatile yet so simple. Although there are only 6 colours, this palette seems to have everything, base colour, crease colour, liner and highlight! The eyeshadows themselves are very soft and pigmented. They blend so easily together and each can be worn alone or layered together. The actual palette is very small, yet the eyeshadows are the full size that you'd find in the other Naked palettes from Urban Decay. This means that the palette is very portable and would be great for travelling or if you're on the go. The palette cost me £20 from Debenhams.


I absolutely love this palette and can't wait to use it. I'll defiantly be uploading some looks done with this palette. But for now, farewell! Thank you for reading!xo
  

Small Haul

I have a small haul today, and although I didn't buy many things, I'm very excited to show the things I bought!

Speckle Roll Sleeve Mini Dress ~ £28

Roll Back Crop Tee ~ £10
Both of these items were bought with summer/holidays in mind. I thought the dress was really nice and simple and could be dressed up or down, same thing with the cropped tee.


Unfortunately, I couldn't find this on the Topshop website, so maybe it's sold only in store. Besides, it was £10.
Possibly the most exciting item I bought today, was indeed the Urban Decay Naked Basics Palette. I think I'll do a full review in another post, but I will say, I love it. 

Thanks for reading!xo

Sunday 14 April 2013

I Love Drugstore Makeup Tag

1) What is your favorite drugstore makeup brand overall?
This one is really hard! I love Maybelline, L'Oreal and Revlon all so much, but I think I'd have to say Maybelline purely because if I could never buy any brand again apart from Maybelline, I wouldn't be too  upset. Maybelline do the best mascaras in my opinion and I also love their eyeliners, brow pencil and  eye shadows. Although, I'm not too keen on Maybelline's foundations..

2) What are your favorite face, cheek and lip products?
For face, I would have to say Revlon's Nearly Naked Foundation. The only thing I don't like about this is  it's quite drying, and can cling to dry patches of skin. But overall, I really like how light it feels and the coverage is also very nice.
For cheeks, I have chosen Natural Collection's Peach Melba Blush. I'm not really one to buy too many blushes and admittedly I have kind of neglected this blush since I bought my Stila Cream Blush, however I do love this one, it's so natural and gives a really pretty colour to the cheeks. It's completely matte which makes it really versatile. 
For lips, it would defiantly be the L'Oreal Caresse Lipstick in 101 Tempting Lilac. It's such a nice colour! It's a little more cool toned which makes it perfect for people who suit colours like grey and navy (like myself). However, the REALLY annoying thing about this lipstick is the colour range. This is the only colour I really like from the range which is such a disappointment since the formula is so nice.
Revlon Nearly Naked (120 Vanilla), Natural Collection Blushed Cheeks (Peach Melba), L'Oreal Caresse Lipstick (101 Tempting Lilac)

3) Least favorite product?
This is easy. I hate this foundation with a passion even though it's from my favourite brand, Maybelline you let me down. It's SO drying and the consistency can be quite gritty. I guess for oilier skin types this could be good as it's very matte. Too matte in my opinion. It has a very distinct look on the face, I can usually tell when someone is wearing this as it's just so matte. See how gritty that is? 


4) What is the best makeup bargain?
I came across this palette recently and I just love it, I don't have much more to say other than the colours are great they are pigmented and have a lovely soft consistency, and the price? You don't get much better value than £3 for 12 eyeshadows..

5) What is your favorite underdog product?
This was probably the first concealer I ever bought, and I loved it for a while. Then I seemed to just forget about it for long time. I was in Superdrug about 2 weeks ago and I thought "I really did love that concealer" so into my basket it went and ever since I've been totally attached. Although it's not too great for under eyes, this concealer is fantastic for covering blemishes. I usually use the Natural Collection Green Concealer first and then layer this on top (using the Real Techniques Detailer Brush) and the blemish is usually almost completely concealed. I don't think this gets nearly enough praise in the beauty blogging world, but I think it's defiantly an essential. Not to mention the price!


6) Drugstore and High End Dupes?
I don't really have any good dupes, however I've heard that Highbeam from Benefit and Beat the Blues from Mememe. I don't have the Mememe highlighter but I've seen swatches of Beat the Blues and Highbeam next to each other, and they look very similar! 

7) Product not worth the hype?
I have two products for this question. The first one has to be the EOS lip balm spheres. I really hate these lip balms, they smell so strong and don't seem to moisturize my lips at all! I had Lemon Drop but I lost it and to be honest I wasn't too bothered at all and I usually love the smell of lemons however this lip balm smelt so artificial and sickly. I still have Honeysuckle Honeydew and I have never liked the scent. I was extremely disappointed with these and really don't understand the hype!


The other product is the Rimmel Wake Me Up Foundation. Now, I don't hate this foundation I just don't love it and don't really get why it's so hyped up. Lots of people have said they don't notice it, but I can't help and see the shimmer. I find the shimmer to be very noticeable but as I said, I don't hate this foundation and wore it quite a lot last summer.  

How do you feel about drugstore makeup? Thanks for reading!xo

Saturday 13 April 2013

Charity Shop/Thift Shop Haul

I love charity shopping. It's all for a good cause and you can find some real gems if you look hard enough. My favourite section is the bric-a-brac; porcelain china, glass ornaments and figures. I love collecting little glass jars and I've recently found some really cute ones.
I bought these jars/pots in Barnardos. The larger one was £3.50 and I use this one to store cotton balls, the smaller one was £2.50 and I use it to store all my dainty little rings.

I bought this bowl in British Heart Foundation, it was £2.00 and I thought it had a really interesting design. I store my many bobby pins/kirby grips in here.

This little ice cream bowl was bought in Cancer Research for £2.50. Although it's an ice cream bowl I thought it made a good hairband holder.

Although it would be very difficult to find the exact same pieces as me, there are plenty of charity shops who sell these little glass holders you just have to have a good look around!
Thanks for reading!xo

DIY Perfume/Vanity Tray

Small Lime Regency Frame
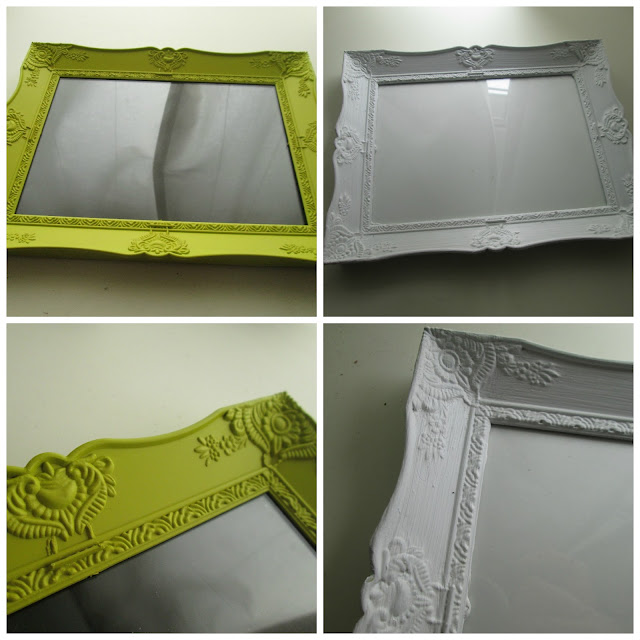
Perfume trays always look so pretty and elegant, but they are so expensive. For a really long time I had been searching for a nice perfume tray that would tie in with the vintage style in my bedroom. However I could only find ones priced for nearly £20, and I thought this was far too much. So, I turned to YouTube and the world of DIY. I found many different tutorials that all seemed to use the same thing: a photo frame. So then the search began to find a really pretty photo frame for a reasonable price. This proved difficult. Rummaging through charity shops and second hand furniture shops, I found nothing. By this time I'd given up hope in finding the perfect frame for my project, until I wondered into Urban Outfitters one day with no intention to buy anything and there it was, the perfect frame. Although the colour was a little off putting, I knew I could just paint it. The great thing about using a photo frame is you can change the bottom image easily and as often as you'd like.


As you can see, all I've done to this frame is paint it white. I used a paintbrush and really quite like the paintbrush marks but if you don't, you could spray paint it or use a sponge. You can also use any photo, collage or patterned paper to be the background image, I used just plain white paper because all though it's quite boring, I thought it might look quite nice and classic. You also dont have to use this as a perfume tray, you can put anything on this, a nice idea would be use it as a bedside table tray and you could put things like hand creams and night moisturizers on it so you can keep your nightly products organised. 
To get mine the opaque colour that it is, I had to use a couple of coats of my white (acrylic) paint. This meant that it took quite a white to dry, but I really recommend waiting for it fully dry before you add another coat of paint or touch it because otherwise it will smudge and you'll have to re-paint over that making it take much longer. Be patient;)


I'm now more determined to grow my perfume collection! Next on my wishlist is either Valentina by Valentino, Marc Jacobs Daisy Sunshine or Rihanna's Nude:)

Thanks for reading and good luck if you try out this DIY!:)xo

Thursday 11 April 2013

5 Product Face Makeup Challenge

I love watching these videos (and reading about them on blogs) so I thought I would do it myself. The challenge/tag is to do your entire face makeup using just 5 products. I've watched many of these videos and I think that multi-use products are the way to go! This tag is great, especially if you wish to cut down on the amount of products you use in the morning or save space in your makeup bag. The best one that I watched so far was this one (click!), where just one blush was used as blush, eyeshadow and eyebrow colour! Anyways, I have a list of products below, why I used them and what I used them for.


Dr Jart Water Fuse BB Cream (I used this as my base and concealer) ~ I used this BB cream because it has a very light, moisturizing effect. Its also the only base I've found recently that doesn't cling to the dry patches of skin around my nose and mouth. I originally planned to used the Revlon Nearly Naked Foundation but when I tried it just made my skin look even dryer than it already is, so I ditched that and went for this one. The coverage is very light, so if you were someone who needed a little more coverage I would recommend using something else. For this base I used the Real Techniques Buffing Brush and I dabbed the BB cream on any ares I needed a little more coverage with my finger tips.
Sleek Face Form Kit in Light (I used the contouring shade for contouring, the highlight shade to highlight my cheekbones and I also used it as a shimmery eyeshadow all over my eyelid) ~ I'm not sure if you're actually 'allowed' to use a palette as I don't know if it's considered cheating but I used it anyway;). I thought this would be a really great option as I could use it for many different things. However I didn't use the blush that comes in that kit because I was already using the cream blush from Stila. For the contour I used the Lauren Luke Flat Contour Brush, for the highlight on the cheekbones I used the Real Techniques Setting Brush and the highlight on the eyelid I used the Real Techniques Shading Brush.

I used this brow pencil mostly because it's a good match for my brow, but also because it has a built in spoolie at the end. I used the spoolie to comb out my brows and also remove any clumps from my lashes after applying mascara.
Stila Convertible Lip & Cheek Cream in Lillium (I used this as my blush shade and I also dabbed it lightly on my lips) ~ Again, I chose this because I could use it for different things. Plus I like the way that the blush matches the lip colour. I used my fingers to apply this.

Maybelline The Colossal Mascara in 100% Black (I used this on my top and bottom eyelashes) ~ I chose this mascara because it's great at making my eyelashes really long and separated which is the what I wanted for this look.


Thanks for reading!xo


Saturday 16 February 2013

DIY Lip Scrub

Do your lips feel chapped? Dry? Like there's a hard layer of skin covering them? They probably need a good scrub, just like your skin needs to exfoliated to remove dead skin cells in order to brighten up your complexion. Well, it's much the same with your lips. Applying lip balm is good, but probably not quite good enough. I used to own one of the Lush lip scrubs (in 'Mint Julips') but I wasn't really too keen on the scent or consistency. I felt that the strong smell of mint was not only overpowering, but it made my lips tingle a little too much. The consistency was very dry and crumbly and didn't seem to moisturize at all. So, I cleaned out the little pot that the Lush lip scrub came in, and decided to make my own! You don't have to use oil, you could use just petroleum jelly, but I find the olive oil has a lovely, moisturizing effect.

You will need:
  • Sugar (depending on how abrasive you want your lip scrub, you use different types of sugar. I used Caster Sugar because I wanted mine to be quite gentle) ~ 2-5 tbsp
  • Olive oil (most other oils work as well) ~ 1tsp
Optional:
  • Petroleum Jelly ~ 1 tsp
  • Flavouring (I used vanilla and mint) ~ a few drops
  • Colouring ~ a few drops


Step 1
Gather your ingredients, measure them out and put them in the bowl, except the colouring and flavouring if you are using them. Mix them together, and put in the microwave long enough for the petroleum to melt (this is optional but I find otherwise, sometimes you get little lumps of petroleum). I put it in for around 20-30 on 850W.

Step 2
Once the petroleum has melted, mix again, leave to cool for around a minute.

Step 3
Add the flavouring or colouring. Mix until all the ingredients are evenly mixed. You can leave it in the bowl if you'd prefer, but I wanted to put it into the little pot instead. I ended up making quite a lot of scrub and after filling the pot, I still had some leftover so I just put it in a sandwich bag and I put it in the fridge. Voila!

I used quite a lot of sugar because I didn't want my scrub to be too runny.

I only used 2 drops of pink food colouring and it turned out this very nice peach colour:)

My dry, chapped lips before..

Use your finger to apply the scrub in small circular motions, then you can lick it off or remove with tissue. 


After removing the scrub and applying a little bit of my Burt's Bees Honey lip balm (which I love!)

Thank you for reading, and good luck!xo

Friday 8 February 2013

Figs&Rouge: Coco Vanilla Balm

Today I'm reviewing one of my favourite product ever! This is the Figs and Rouge lip/face/body/hand balm in a tin. I adore this stuff, I use it all the time and its super moisturizing and so versatile. I think this is an absolute essential and I don't think it gets nearly as much hype as it deserves. The thing about Figs and Rouge that really caught my eye was the fact that it was 100% organic,I'm an absolute sucker for any kind of organic beauty/skincare/lipcare. I also am in love with the adorable little tins, I'm not usually a fan of lip balms in tins, but these ones really do float my boat with their cute designs. I bought mine in Boots for £4.99 which may seem pricey for a lip balm, it has 17ml of product which can be used on  more than just lips. This has been a real essential for me throughout winter as its so moisturizing and really helped my extremely dry (to the point of being flaky..) skin on my nose, and I know it'll be great for summertime aswell and its so travel friendly and has so many uses. Here is a link to Figs and Rouge's website telling you all the uses.


The "Coco Vanilla" flavour/scent is my favourite of the ones available in Boots, I LOVE the smell of this even through it isn't that strong. To me, it smells faintly like vanilla cookies but seems to smell different to everyone (one of my friends said it smells like white chocolate!)
Figs&Rouge are also a British company


I took these photos a while ago, and have since had to replace the lip balm as I ran out! 


The consistency is actually quite thin, but its got a unique kind of oily, waxy type feel to it. 
I can't wait to buy more of these, because I'm aware that they've come out with a squeeze tube of their lip balm, which is great if you're on the go and you don't want to go putting your fingers in the little tin. They've also come out with hand creams, which I'm of course going to have to try aswell! But sadly, the new products aren't available in Boots, so you have to order them off Feel Unique. There is a list of places to buy the lip balms on the Figs and Rouge website.

Thursday 7 February 2013

Look Beauty: Brow Perfect Kit

So, yesterday I decided to buy the "Look Beauty Brow Perfect" kit after seeing it in a video on Sprinkleofglitter's YouTube channel and I thought it looked great. I'd been looking for a good brow kit for some time and I thought this one looked great. So, when browsing in Superdrug I decided to pick it u. It was  £7.99 and considering how much is included, I think that's a very reasonable price! The kit contains...


  • x4 Eyebrow Stencils

  • x1 Fixing Gel

  • x7 Brow Shades

  • x1 Mini Tweezers

  • x1 Double Ended Precision Applicator


The packaging
It also has a really large mirror!


There is also a pull out draw at the bottom, which holds the stencils.

Overall, I really do like this brow kit, but I think I'm still going to look for another one in the future. The brow powders are all a bit too warm toned and they look quite un-natural on my ashy, taupe brows. However, I LOVE the brow fixing gel that comes in the kit, it is perfect in every way! It keeps my brows in place all day and although at first it feels a little weird as it seems to almost, harden your brows but once you get used to it, you don't even notice. The tweezers are also great as they are very strong and firm which means they can easily pluck eyebrow hairs quickly ad easily, despite their mini size. The double ended "precision" applicator is not so great. It's very thick so its difficult to use when you have quite thin brows. It's also too firm, and the bristles are made from a very hard plastic. I can really say too much about the stencils, because I'm not really one to use stencils, I tend to just follow my natural brow shape instead. Although the brow shades aren't great for me, I still will continue to use the kit and I think its defiantly great for travelling seeing as it has pretty much everything you need for your brows.


Thank you for reading!xo

Wednesday 2 January 2013

Lauren Luke Essential Brush Set (review and pictures)

Hi guys, I'm so pleased to be reviewing this set, I can hardly contain my excitement! I've wanted this brush set for ages, in fact, I've wanted them ever since they were released. So, as you can imagine I was very, very pleased when they were under the tree on Christmas Day. I have been a really big fan of Lauren Luke ever since she started making videos, she was the first YouTube makeup guru I ever watched and that's were my love for makeup began, so I guess I have her to thank!:) Anyway, I delayed ordering these brushes for a long time and instead I asked for them for Christmas, and I must say that I'm SO pleased that I got them! I absolutely love these brushes, and haven't really touched my other brushes since I got them. They are very, very soft, yet not so soft that they don't pick up product. There are a mix of synthetic and natural hair bristles, which I think is great because although I do prefer natural bristles, for some things such as applying cream, liquid or gel formulas it can ruin natural bristles which is why you would need synthetic, for things like foundation, ect. I will list below which brushes are synthetic and which are natural. The kit has 8 essential brushes and you can either buy these in the set or on their own. The brushes retail at £33.75 when buying the full set. Its a little bit cheaper (£3.50, to be precise) to buy the full set of eight rather than buying them separately. I think the whole set is amazing value considering the quality. It would cost you more to buy two Mac 217 blending brushes (£34) rather than this set (£33.75) two brushes or eight hmm, I definitely know which one I'd prefer..


I love the handles!

This is the flat contour brush. I use this for contouring or applying bronzer, but you could use it for blush or highlighter.
This is a rounded foundation brush. You could also use it for  cream blush, cream bronzer or liquid highlighter.


This is such a dense brush!
This is the powder brush, and it's huge! I love this for powder and bronzer.
Its also tapered.
This is such a soft brush and dense!
I use this brush for blending colour through the crease. This brush has slightly
longer bristles than the other blending brush.
I use this one for placing colour in the outer-v and the crease. 
This is the pencil brush, its really small and pointy, so its perfect for  putting  colour on the
lower lash line as well as putting colour in the outer-v.

This is the flat shading brush. This is really good for packing eye shadow directly onto the lid.

I use this angled brush for my brows as its very thin and precise. However you could use it  for eyeliner.

Flat contour brush- Goat Hair, Cpara Hircus (£5.25)
Pointed foundation brush- PBT hair Synthetic (£6.00)
Tapered blending brush- Goat Hair Cpara Hircus (£4.50)
Crease/contour brush- Goat Hair Cpara Hircus (£4.50)
Flat eye shadow brush- Goat Hair Cpara Hircus (£4.00)
Pencil brush-Goat Hair Cpara Hircus (£3.25)
Brow brush-  PBT hairSynthetic (£3.25)
Powder brush- Goat Hair Cpara Hircus (£6.50)

Overall, I love these brushes so much and I'm already thinking of buying more just because I think they're so great. In the future, I really hope Lauren comes out with more brushes, and if she does, I will defiantly not hesitate to buy them this time:) I recommend these to anyone, professional or beginner. I haven't washed them yet, so I will blog again in the future with my impressions after they've been used more and washed.
Click here to buy the brushes.

Thanks for reading!xo